Sunday, May 31, 2009

Play MIDI with fluidsynth in my EeePC

A few days ago, I read in the EeeUser Forum someone saying fluidsynth plays MIDI better than timidity on his EeePC. As I have reported in this thread, timidity is the way I used to play MIDI in my EeePC. Now that I have installed a fresh new 1.6.1 verson EeePC Linux to my 4G, I would like to try out something new. So I take this opportunity to test on installing fluidsynth to play MIDI.

Setting up Debian etch repositories

fluidsynth is available from the Debian repositories. So add this line (as root) to your /etc/apt/sources.list
deb http://ftp.debian.org/debian/ etch main non-free contrib
It seems that recently Debian mirrors have extended their PGP keys even to etch (oldstable) repositories, so if you don't want to see the system complain, you will need to install the PGP key as follows:
/home/user> gpg --keyserver wwwkeys.eu.pgp.net --recv-keys 9AA38DCD55BE302B
gpg: directory `/home/user/.gnupg' created
gpg: can't open `/gnupg/options.skel': No such file or directory
gpg: keyring `/home/user/.gnupg/secring.gpg' created
gpg: keyring `/home/user/.gnupg/pubring.gpg' created
gpg: requesting key 55BE302B from hkp server wwwkeys.eu.pgp.net
gpg: /home/user/.gnupg/trustdb.gpg: trustdb created
gpg: key 55BE302B: public key "Debian Archive Automatic Signing Key (5.0/lenny) " imported
gpg: no ultimately trusted keys found
gpg: Total number processed: 1
gpg: imported: 1 (RSA: 1)
/home/user> gpg --armor --export 9AA38DCD55BE302B | sudo apt-key add -
OK

Installing fluidsynth

Then, you can update apt cache and proceed to install fluidsynth.
/home/user> sudo apt-get update
/home/user> sudo apt-get install fluidsynth
Reading package lists... Done
Building dependency tree... Done
The following extra packages will be installed:
ladcca2 libfluidsynth1
The following NEW packages will be installed:
fluidsynth ladcca2 libfluidsynth1
0 upgraded, 3 newly installed, 0 to remove and 226 not upgraded.
Need to get 0B/215kB of archives.
After unpacking 606kB of additional disk space will be used.
Do you want to continue [Y/n]? y
Selecting previously deselected package ladcca2.
(Reading database ... 72482 files and directories currently installed.)
Unpacking ladcca2 (from .../ladcca2_0.4.0-6_i386.deb) ...
Selecting previously deselected package libfluidsynth1.
Unpacking libfluidsynth1 (from .../libfluidsynth1_1.0.7a-1_i386.deb) ...
Selecting previously deselected package fluidsynth.
Unpacking fluidsynth (from .../fluidsynth_1.0.7a-1_i386.deb) ...
Setting up ladcca2 (0.4.0-6) ...

Setting up libfluidsynth1 (1.0.7a-1) ...

Setting up fluidsynth (1.0.7a-1) ...

/home/user>
I have also tried installing qsynth, a GUI to fluidsynth, but it is not particularly interesting. So, I just work with fluidsynth on the command line.

Setting up fluidsynth to play MIDI

Before you can get fluidsynth to play MIDI files to alsa, you first need to load the alsa MIDI sequencer kernel module.
/home/user> sudo modprobe snd-seq-midi
A better idea is to add "snd-seq-midi" to your /etc/modules file so that the system will automatically load it at start up.
/home/user> sudo bash
asus-1624754341:/home/user> echo snd-seq-midi >> /etc/modules
Now you will need to download a sf2 soundfont for fluidsynth to play MIDI. After all, fluidsynth is just a soundfont player.

There are plenty of sf2 you can download from the web. The one I am using is 5MBGMGS.sf2 - not too heavy for the EeePC, but acceptable quality.

Now you are ready to play MIDI with fluidsynth. Of course, you will also need a MIDI file, and the one I use to test MIDI players is the beautiful As Time Goes By in piano.
/home/user> fluidsynth -ni 5MBGMGS.sf2 AsTimeGoesBy.mid

Setting up File Association in File Manager

To set up File Association in File Manager to play MIDIs with fluidsynth, you will have to create a kde desktop shortcut for fluidsynth:
home/user> sudo touch /usr/share/applications/fluidsynth.desktop
home/user> sudo kwrite /usr/share/applications/fluidsynth.desktop &
Paste the following content into the file:
[Desktop Entry]
Type=Application
Encoding=UTF-8
Name=MIDI Player
GenericName=fluidsynth MIDI player front-end
Exec=fluidsynth -ni /home/user/5MBGMGS.sf2 %f
Comment=fluidsynth MIDI soundfont player front-end
Icon=amarok
MimeType=audio/x-midi
Terminal=false
Categories=Qt;KDE;AudioVideo;Player;
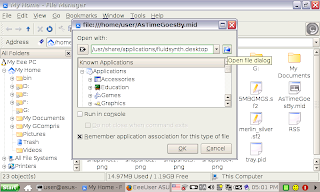
Then double-click on a MIDI file in File Manager, and select "Open with": /usr/share/applications/fluidsynth.desktop

Also, remember to check the box "Remember application association..." Then, clicking on a MIDI file will have fludisynth playing it in the background.

Comparing fluidsynth and timidity

But I found that, unlike timidity, playing MIDI with fluidsynth is often affected by running of other applications. Comparing the "top" output running the 2 programs reveal that fluidsynth is using about 80-100% CPU usage, whereas timidity only use 17% at max.
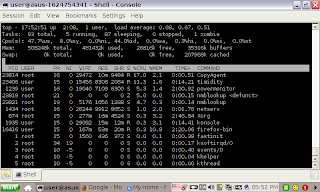
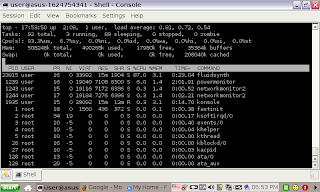

So, for my 4G, timidity is obviously the better choice.

Setting up qsynth

For those who would like to use qsynth as GUI interface to fluidsynth for easy setting of Reverbs, chorus effects, etc. Here is how to set it up:
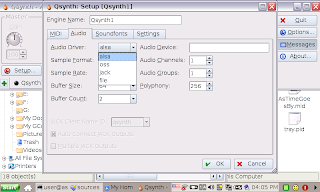
From the "Audio" tab, select "alsa" as Audio Driver.
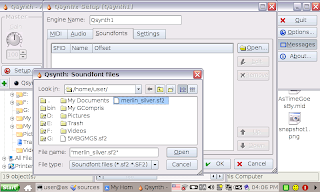
Load a sf2 soundfont file from the "Soundfonts" tab. Then click [OK].
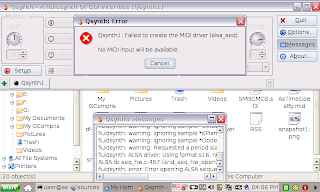
This error is before I loaded the "snd-seq-midi" kernel module.

Wednesday, May 27, 2009

Restore EeePC from Recovery DVD without unionfs

A few weeks ago, there was a discussion in this thread of the EeeUser Forum on restoring an EeePC from the Recovery DVD image but without union filesystem. At that time, I had modified my Boot Xandros from USB for Dummies nounionfs script for this but I had no time to test it.

Today, since it is public holiday in Hong Kong and I don't need to work, I have finally tested this out and confirmed that this works on my 4G for both the 701 recovery image of my 4G and a 1.6 French iso I have downloaded. I suppose it should also work for all EeePC models.

What this script does:
1) Restore the Recovery DVD image to the 1st SSD (/dev/sda)
2) Copy a new initramfs image (for booting without unionfs) to /boot and modify the grub boot menu (/boot/menu.lst) accordingly
3) fdisk to create 3rd and 4th partition (sda3 and sda4) in /dev/sda (for BIOS update and Boot Booster)
4) Resize /dev/sda1 to fill up the remaining space in /dev/sda

Please note that unlike the default restore script, this script will not format the 2nd SSD (/dev/sdb). So if you have a 900 or later models with 2 SSD, with /home mounted in /dev/sdb1, your personal data will be untouched.


RESTORE STEPS:

1) Put your EeePC Recovery DVD into the DVDROM of your winxp desktop pc, run the Asus BootTool FreeOSTool.exe to create an Asus EeePC System Recovery USB disk as per instructions in your EeePC User Manual or as per this wiki: Howto: USB Restore or read my blog of 2009/6/3 for screenshots and detailed steps.

2) Download initramfs-eeepc-nounionfs-ext3.img compiled by eFfeM and save it to the root folder of the Recovery USB disk
3) Download restore-nounionfs.tgz and extract the files to the root folder of the Recovery USB disk [NB. Do not use winzip to extract the files]
4) Now plug this Recovery USB disk to your EeePC, reboot and press [ESC] at bootup to select the USB disk as 1st boot device
5) Then the script will run, and after user confirmation (Enter "yes"), restore the system to the 1st SSD without union filesystem


NOTE:

  1. If you want to use another initramfs image, say initramfs-eeepc-nounionfs.img for non-journalled ext2 filesystem, you can modify line 8 of the script restore-nounionfs.sh to reflect the change. If, however, you want to use an initramfs image for ext2 filesystem, you should also comment out line 110 of the script.
  2. The script should also allow you to restore to the 2nd SSD, just edit line 6 of restore-nounionfs.sh, but this is untested.

Change Language from French to English

The 1.6 French iso supports both French and US English. You can easily change the locale to English once you have started up. However, the firstrunwizard is in French. So you will need to learn a little French to go through the wizard:

Anglais = English (to select keyboard)
Retour = Back
Suivant = Next
Annuler = Cancel
Nom = Name
Terminer = End

You can forget all other settings (except "user name" and "password") because you will need to run the firstrunwizard again to completely change the system to English.

So after your system has started up. Run /opt/xandros/bin/locale_dialog either from File Manager or in a terminal.

Then select "Anglais (US)" from the pull-down menu, and press "Suivant" (Next).

In the next dialog box, select "Oui" (Yes) to apply the change.

Now the tabbed menu will be changed to English, but the programs menu are still in French. Next you need to delete the hidden file .firstrundone in /home/user. Then on reboot, everything will be in English except Acrobat pdf reader and the French dictionary which you will need to uninstall and install the English version after changing your /etc/apt/sources.list to:
deb http://update.eeepc.asus.com/1.6 common main
deb http://update.eeepc.asus.com/1.6 p701 main
deb http://update.eeepc.asus.com/1.6 en main
[Note: search for "-fr" in synaptic and uninstall them all. Then install "xlex" to get back the English Dictionary. For me, I also install all "-zh-tw" packages (except for firefox3) for Traditional Chinese locales.]

Monday, May 11, 2009

Play gp5 files with tuxguitar in EeePC Linux

I used to be a guitar player and I use Guitar Pro 5 in my Windows desktop for writing and playing guitar tablatures. So I have a collection of gp5 files.

Today, I found a thread in EeeUser Forum on using tuxguitar in EeePC. So I think it should be worthwhile to try installing tuxguitar on my EeePC Linux (desktop version) and have access to my gp5 files.

I found that installation is very easy and straightforward and the binary version just simply works.

- First, download tuxguitar-1.1-linux-x86.tar.gz
- Then in File Manager, right click on the file > select [Extract All ...] > Extract it to where you want it to be (/home/user/bin/ for me).
- Navigate into the tuxguitar-1.1-linux-x86 folder and doubleclick on the file tuxguitar.

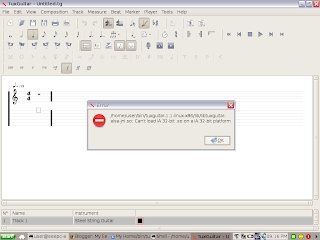
There is an error message at startup. But the program runs OK.

And here is a screenshot playing deep purple - soldier of fortune.gtp

The playback sound quality is quite good with the audigy2 sound card in my desktop. But I doubt if it will be smooth using timidity or fluidsynth in my EeePC 4G. Probably I will need a minimal soundbank to play MIDI smoothly.

Some people reported an "Unavailable Soundbank Error" which is due to missing default soundbank for Java Runtime. But this does not seem to be the case for the EeePC Linux installed to my desktop. If you come up with this problem, read the solution here: TuxGuitar Documentation » Unavailable Soundbank Error.

Saturday, May 2, 2009

Backup and Restore my EeePC

So I decided to restore my EeePC to the original 701 version today.

I have been doing backup and restore of the whole SSD of my EeePC booting from Pupeee, which is a customized version of Puppy Linux for the EeePC that has everything (except webcam) set up already by default. You only need to download the puppy-eee.iso, burn into a CD, then transfer the system to an USB stick, and boot up - no need for any configuration.

Note:

1) Here are some references for how to transfer Puppy Linux to an USB stick:
-
Puppy on USB pen drive (using the Universal Installer of Puppy Linux)
-
Installing Puppy to USB flash drive from within Windows (if you don't want to burn a CD)
2) For more information on how to use Pupeee, you can refer to the instructions I have written here.

Getting start with Pupeee

So, to start with, first boot up from Pupeee. Press [ESC] at bootup of the EeePC, and select the USB disk as 1st boot device. After a while, you should arrive at the Pupeee desktop.

Next, click on the "drives" icon on the desktop. This will bring up the "Pmount Puppy Drive Mounter" where you can mount the USB drive that stores your EeePC SSD backup image.

Just click on the "harddisk" icon on the right. When you see it becomes green, then the drive is mounted. In my case, I store the backup image in /dev/sdb1, which is mounted to /mnt/sdb1.

Note: In the case of my 4G, /dev/hdc (Drive: SILICONMOTION SM223AC) is the SSD. Be sure not to mount this while you backup and/or restore. The "harddisk" icon on the right should NOT be green.

Restore SSD with dd command

Now, I open a terminal by clicking on the console icon on the desktop, and enter these commands:
cd /mnt/sdb1/eeebackup
gzip -dc SSD.img.gz | dd of=/dev/hdc
Here, SSD.img.gz is the filename of my backup image, and eeebackup is the folder name where I stored this backup image in the USB stick (that is mounted to /mnt/sdb1).

Now time for a coffee. It will take some time (depending on how you have created your backup image).

Backup SSD with dd command

To backup, usually I will take one more step: write zeros to the SSD to reduce the backup image size. For this, you will need to mount all the partitions in drive hdc (with pmount), i.e. hdc1, and hdc2 if you still keep union filesystem.
cd /mnt/hdc1
dd if=/dev/zero of=delete.me bs=8M; rm delete.me
After this is done, then umount the drive (with pmount) and proceed to backup with the dd command:
cd /mnt/sdb1/eeebackup
dd if=/dev/hdc conv=noerror,notrunc,sync bs=64K | gzip > [Backup Image Name].img.gz
Note: If you have retained union filesystem, then it is sensible just to backup the 2nd partition of the SSD, i.e. /dev/sda2 in EeePC Linux or /dev/hdc2 in Pupeee, because the 1st partition is always mounted read only and will never change. In this case you can replace "hdc" with "hdc2" in above dd backup and restore commands.

So, now I am back to my familiar EeePC 4G simple mode desktop with start menu enabled and with random wallpaper.

Next, I will install checkinstall and try to build some Debian packages.

Friday, May 1, 2009

Auto Shutdown my EeePC

Today I continue to work on how to auto shutdown my EeePC.

One possibility is to use the "Task Scheduler" of kde (Advanced Desktop), but this only allows you to specify a time delay (in seconds), and only 1 command to be executed.

Please note that you have to run the fastshutdown script as root, i.e. add sudo before the command.

In the Easy Mode simple desktop of my EeePC 4G with icewm start menu enabled, the "Task Scheduler" can be run from the Programs menu as follows:

Alternately, you can simply run the command "ktimer".

Shutdown my EeePC with the "at" command

To be able to specify a certain date/time to shutdown my EeePC, I looked for other possibilities.

One possibility is to use crontab, which come installed by default. But since this is only for a 1 time job, using crontab is not a good idea. So I turned to the "at" command which is not installed by default, but can be easily installed from the Xandros4 or Debian etch repositories.
/home/user> apt-cache policy at
at:
Installed: (none)
Candidate: 3.1.10
Version table:
3.1.10 0
500 http://xnv4.xandros.com etch/main Packages
500 http://ftp.debian.org etch/main Packages
500 http://ftp.us.debian.org etch/main Packages
3.1.8-11 0
500 http://www.geekconnection.org xandros4/main Packages
After you have enabled either of these repositories, you can proceed to install the package "at".
/home/user> sudo apt-get install at
Reading package lists... Done
Building dependency tree... Done
The following extra packages will be installed:
courier-authdaemon courier-authlib courier-authlib-userdb courier-base courier-mta
Suggested packages:
courier-doc
The following NEW packages will be installed:
at courier-authdaemon courier-authlib courier-authlib-userdb courier-base courier-mta
0 upgraded, 6 newly installed, 0 to remove and 287 not upgraded.
Need to get 1736kB of archives.
After unpacking 4678kB of additional disk space will be used.
Do you want to continue [Y/n]? y
There will be a message box asking about configuring web-based administration. I think this is optional. Answer [Yes] only if you want to shutdown your EeePC from another computer.

Now to shutdown my EeePC with the command "at", here is what I have figured out:
/home/user> sudo atd
/home/user> at 1246
warning: commands will be executed using /bin/sh
at> sudo fastshutdown.sh
at>
job 11 at Sat May 2 12:46:00 2009
/home/user>
Basically, the steps are:
1) Run the at daemon as root (sudo atd)
2) Run the at command with a specified time, e.g. at 1246 (i.e. at time 12:46)
3) At the at> prompt, enter the command(s) to be run
4) Press [Ctrl]-[D] when you are done

If you want to cancel a pending job:
1) Use the "atq" or "at -l" command to list pending jobs
2) Note down the pending job number
3) Cancel it with the command: atrm [job number]

See http://www.computerhope.com/unix/uat.htm for more details.